| WA8LMF Home Page | WA8LMF Resume | Main APRS Page | HF APRS Operation | Updated 08 June 2026 |
I have made a backup image of my VARAtrack setup that can be downloaded and used to make a bootable 16GB flash drive. In turn, the flash drive can be booted on the stick PC, and used to restore the VARAtrack setup image to similar stick computers.
When you are finished, you will have a bootable flash drive that contains both the image of the VARAtrak setup, and a copy of the freeware Hasleo Backup Suite backup/restore tools. The Hasleo tools will start automatically when the flash drive is booted.
| NOTE: You do not need to go through
the default "first time run" a.k.a."OOBE" (Out-Of-Box-Experience) to
setup the factory-loaded Windows 11 on the stick. Loading the VARAtrack image will wipe out and override anything currently on the
stick. However, you might want to make a backup of the factory load in case you ever want to restore the stick to OEM. If you create the bootable flash drive using a 32GB or larger drive, there will be enough room for a backup of the OEM load along with the VARAtrack install image. You could boot, run the Hasleo tools to do the backup of the OEM load onto the flash drive. Then reboot and use the same flash drive and Hasleo tools to do the restore of the VARAtrack image from the same flash drive to the stick. Note that the OEM load on the stick is Windows 11. The VARAtrack build is based on Windows 10 Pro. |
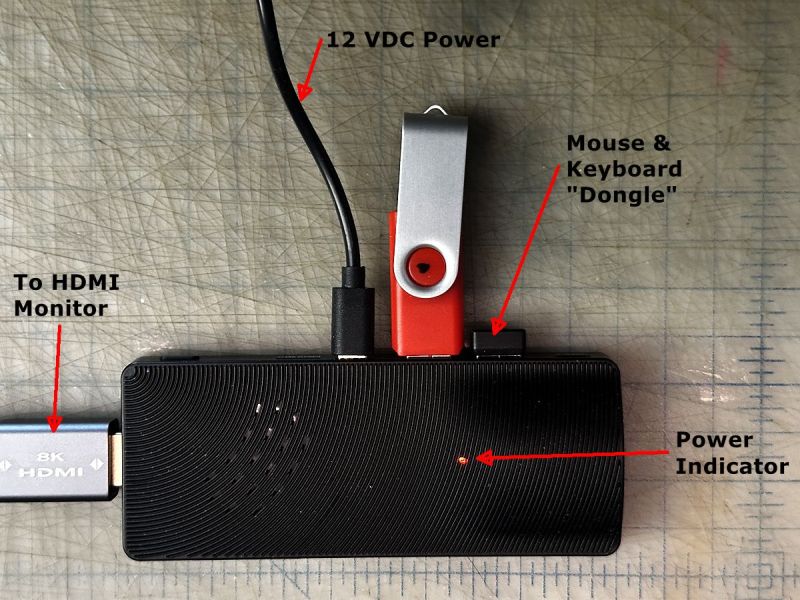
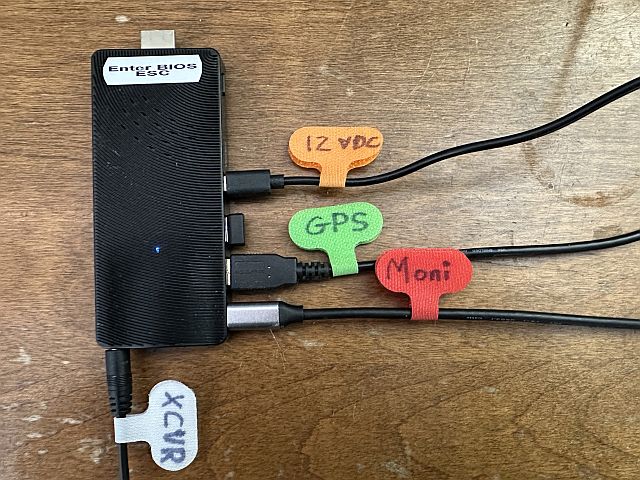
Setup the stick PC with a mouse, keyboard and HDMI monitor. Note that the stick PC has a FEMALE HDMI plug on it - it was intended to be plugged directly into an HDMI port on the back of a TV or monitor. You may need either a male-to-female HDMI "extension cord" -or- if you want to use a normal male-to-male HDMI cable, a female-to-female HDMI gender-changer adapter. One of these adapters shows in the photo below.
Initially, to set up the device, plug the USB receiver "dongle" of a wireless mouse/keyboard set into one of the USB ports. Plug the HDMI connector into a HDMI port on a digital TV or monitor. Insert the flash drive into one of the USB ports. When first connected to 12VDC power, the Power Indicator LED will be red. Press and hold the power button several seconds until the LED turns blue.
I have found that the stick is somewhat erratic in initializing some HDMI monitors that have aggressive energy-saving routines. If no signs of boot activity show show on the monitor after 30 seconds or so, you may have to try again. Push and hold the stick's power button until the power indicator turns red again. Wait 30 seconds or so, and then press-and-hold again until the indicator turns blue.
 Press
Press
By default, the PC always boots from the internal hard drive first. You have to enter the BIOS firmware to set boot from the external flash drive instead. As soon as you press the power button, repeatedly press <ESC> or <F2> depending on model to enter the PC's BIOS setup routine. (The Higole sticks respond to <ESC>) You only have a few seconds before the normal boot process from the internal drive starts.
This screen or something similar should appear.
Use the keyboard arrow keys (the BIOS input routines do not support the mouse) to move the top-line hi-lighter to "Boot". You should get something similar to this screen.
Cursor down, select "Boot Option #1" and hit <ENTER>.
The resulting pop-up will be defaulted to the normal internal hard disk a.k.a.
"Windows Boot Manager". Select the choice that somehow describes
your flash drive.
In my case, this is the rather unobvious header in the no-name
generic flash drives I buy from Amazon by the case, that you see above.
Select the final choice in the top line to "Save and Exit" . The PC will reboot, this time starting from the flash drive. If your flash drive has some sort of activity indicator LED on it, it will flash constantly as Windows PE and then the Hasleo utilities load. BE PATIENT -- This process will take about 4 minutes. Ultimately the Hasleo home screen will appear.
[Note that this override of the default boot sequence DOES NOT stick. The boot sequence resets to default (internal drive first) every time the power is cycled off and back on.]
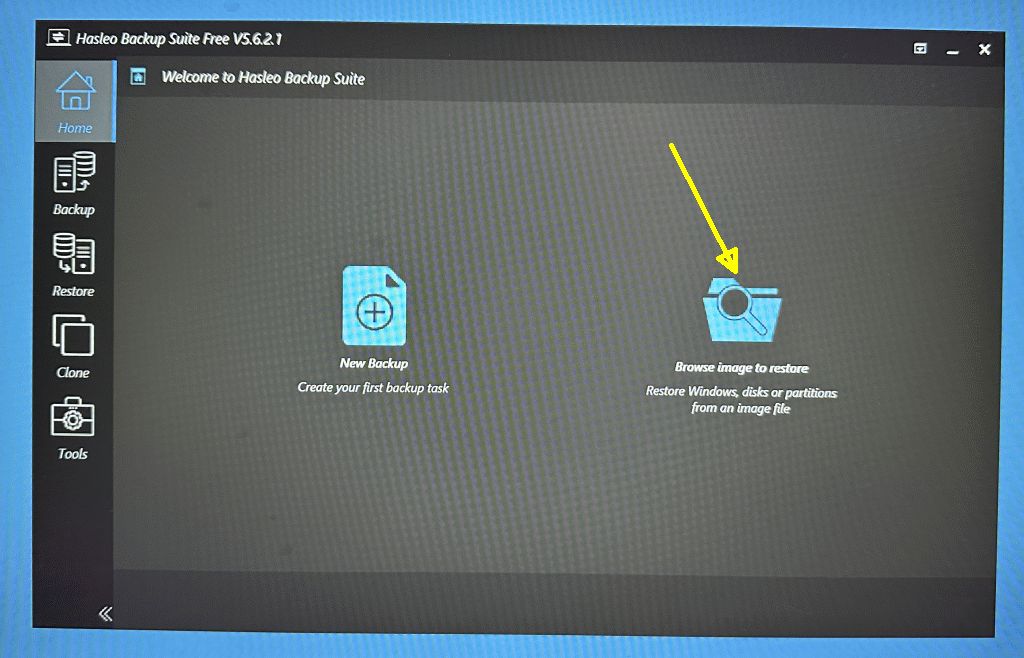
Select the Restore activity from the Hasleo home screen:
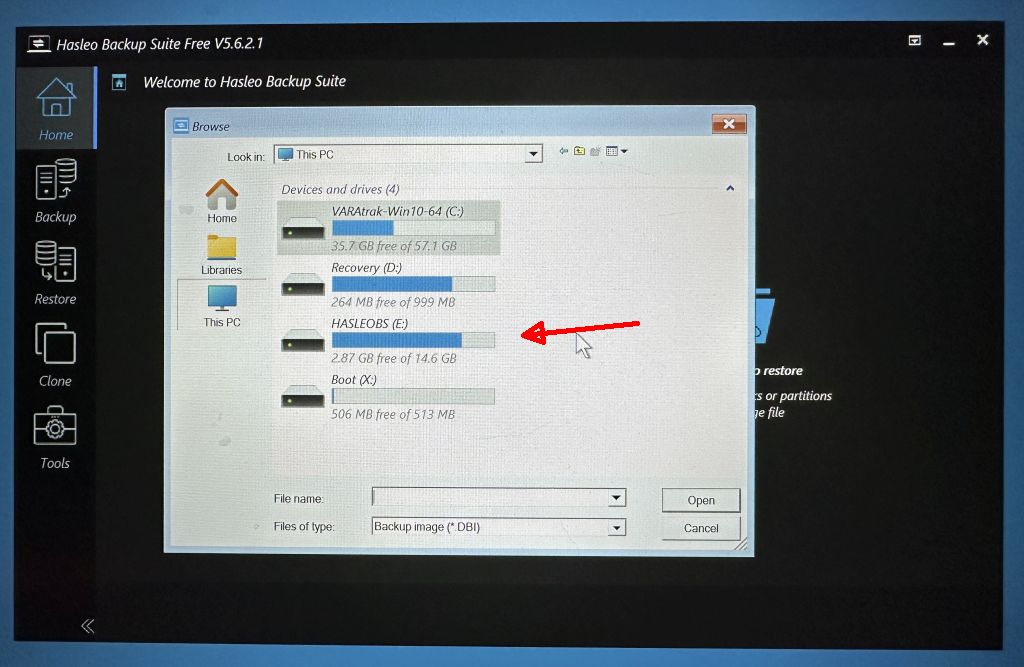
Select the flash drive as source. There are several
hidden partitions (UEFI boot, recovery, etc) on the stick PC's hard drive. The
flash drive will most likely show up as "Drive E:. It will always have the
volume label "HASLEOBS". Select it and click "Open".
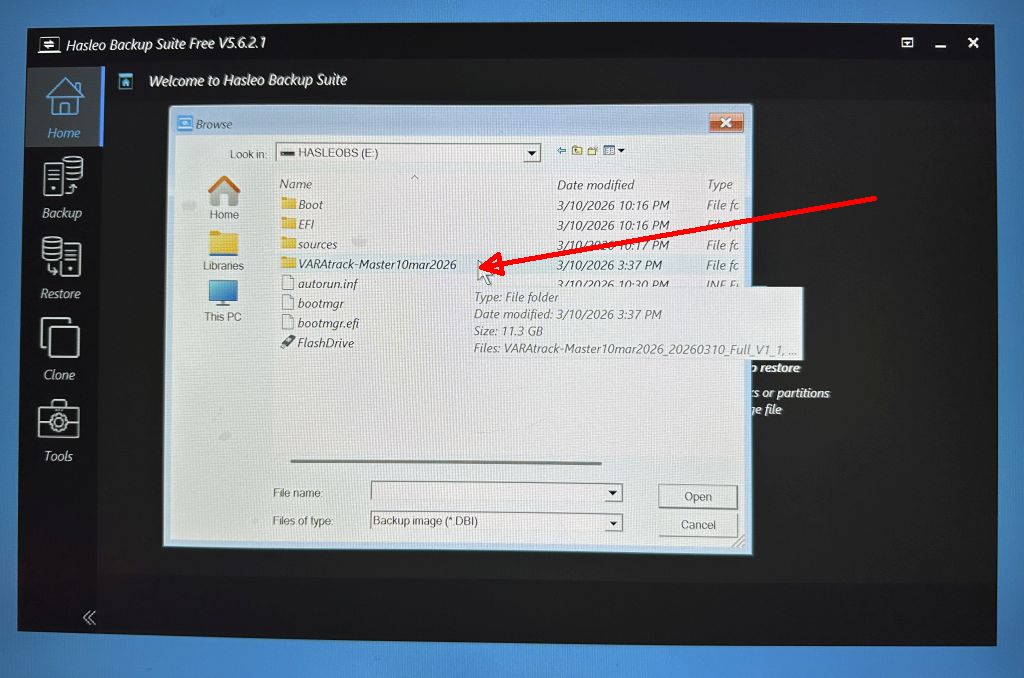
After selecting the drive, navigate to the folder
containing the backup. Select the "VARAtrack-Master-xxxx" folder and click
"Open"
.
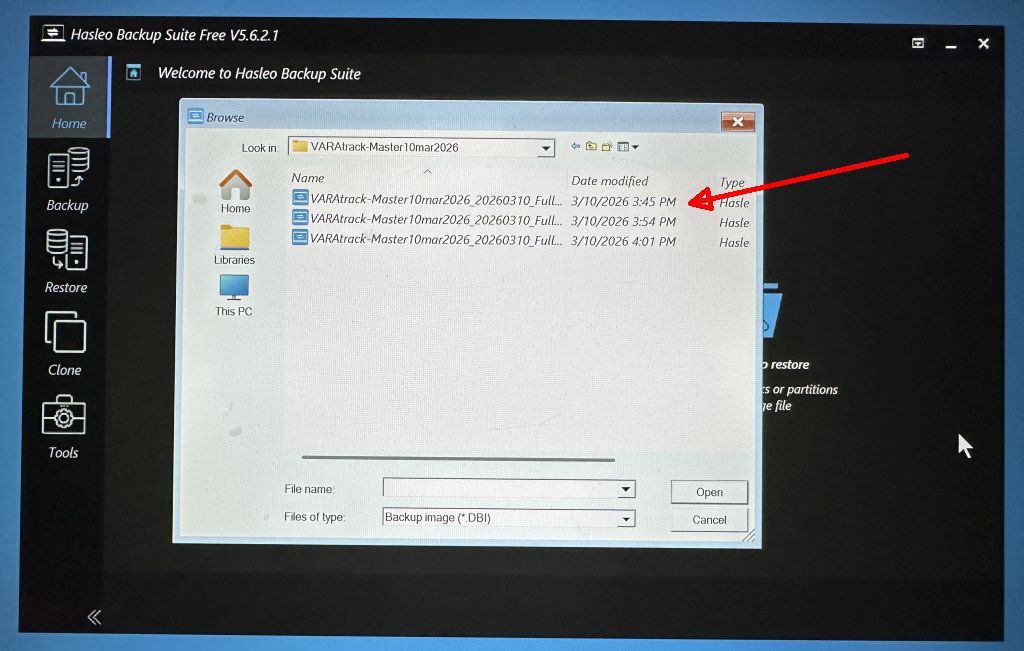
The original backup split the large image file into
multiple segments. Chose the first file of the set (the one with the
earliest time stamp) and click "Open".
The restore dialog offers the choice of overwriting
entire disks, or just individual partitions. The stick PC drive has
multiple partitions (UEFI boot, restore, etc) in addition to the main "Windows
Drive C:" partition. Choose the "Partition" option to preserve the
other partitions as-is.
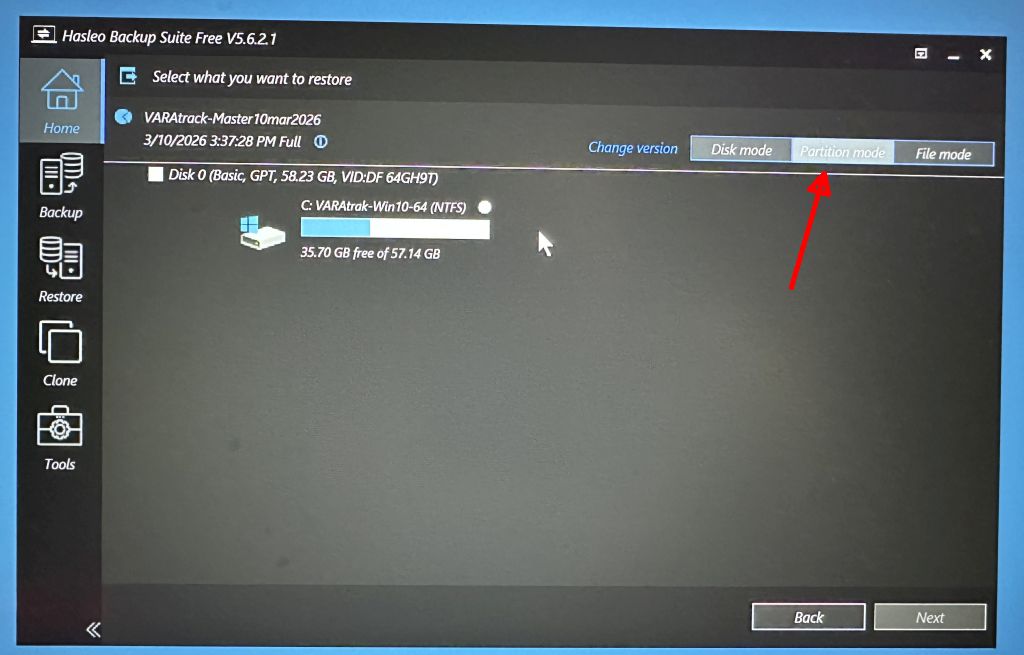
Select the target partition for the restore. The desired
target partition is easy to recognize - it's far larger than the others.
Click "Next" to start the restore operation.

The restore process will take about 20 minutes. When it completes, disconnect the flash drive and turn the stick PC's power off.
Plug a USB GPS such as the GlobalSat BU-353 into the other USB port. The connections should look something like this. [Once configured, you can remove the keyboard, mouse and monitor and power-up the device "headless" for tracker duty, after connecting the TX/RX audio to your radio.]
Boot initially with the monitor, keyboard and mouse connected. These are standard-edition Windows ham programs - you will need to insert your registration codes and callsign into VARA, UIview and any of the other programs you are interested in. If you choose to use an external sound-card interface, you will have to set VARA to use them instead of the internal sound system.
Depending on the USB GPS used, it may randomly be assigned a COM port # other than COM7, and thus not be seen by the VSPE com-port splitter. If so, use the Windows Device Manager (convenient direct shortcut provided at the upper-left corner of the desktop) to reassign the GPS com-port number to COM7
On first-time boot with the monitor connected, you should see the following sequence of screens:
The BIOS screen - may or may not appear depending on
your monitor - some so-called "energy-saving" monitors often don't wake up fast
enough to show the early stages of the boot process.

This customized version of the usual Windows 10/11 "lock
screen" will appear. The setup is defaulted to "No Log-In Required".
It will display for a few moments and then disappear. No action on your part is
required.

Finally, the desktop something like this should appear
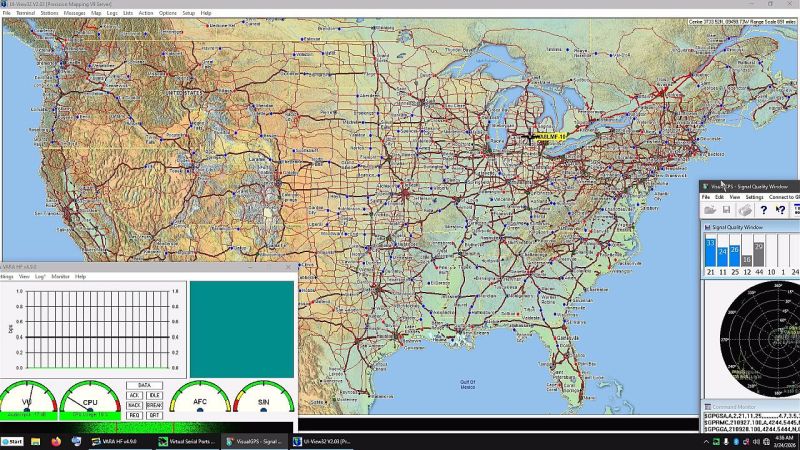
The VARAtrack is now ready to be configured and used. If you want to use some of the other programs pre-installed on the drive, close VARA and/or UIview and browse the desktop or "Start" menu for the other "goodies".