| WA8LMF Home Page | Resume | Main FLdigi APRS Page | Updated 12 August 2020 |
FLdigi only provides KISS-TNC-like connections over TCP/IP. It does not support classic KISS-over-serial port connections (either physical or virtual such as over USB<-->serial dongles or Bluetooth virtual serial links).
You must use two additional applications to create a serial-to-TCP/IP bridge. The open-source freeware application "Com0com" and it's companion app "Com2TCP" provide this link.
Com0com creates a pair of virtual com ports cross-connected, allowing two serial-port-using programs on the same machine to talk to each other. In other words, a virtual serial "null modem" -- the net effect is identical to plugging a physical serial crossover (null-modem) cable into two serial ports on the same machine. Com0Com installs as a Windows device driver. It shows up in the Windows Device Manager like other com ports after install. You can create as many pairs of these ports as you want, and assign any com numbers to their two ends. For the KISS com-to-TCP bridge application, you only need one pair.
| Many older programs, such as UIview, can access only the first eight com numbers COM1 through COM8. Newer programs such as YAAC, APRSis32 or the serial-to-TCP bridge can access any COM number up to 255. To "conserve" the low-order ports for programs that need them, I suggest configuring the bridge with one low COM number and one higher com number. For example, COM8 on one end and COM18 on the other end. |
The initial install of Com0Com creates a single pair of com ports with lettered names rather than the traditional "COM" numbers. These symbolic com ports show up in the Windows Device Manager under "Other Devices" rather than the usual "Serial and Parallel Ports" branch of the Device Manager tree. This is to avoid conflicts with possible existing "COM" numbers already assigned by Windows. These names can be changed to the usual "COMnn" numbers after the initial install with the configuration tool below.
Once installed, Com0com is setup and changed with a separate configuration tool with a typical Windows graphical interface. This display requires the Windows DotNET framework 2.0 or higher. Windows 7, 8 and 10 include this Windows add-on by default. If you are planning to setup Com0com on Windows 2000 or XP, you may have to download and install DotNET from the Microsoft website.
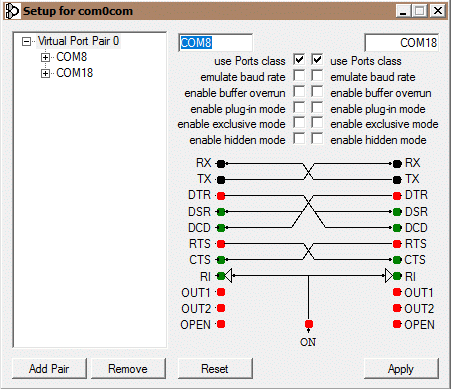
The Com0com config tool.

Highlight the virtual port with named ports. Edit and change the names in the two white boxes at the right to normal "COM" numbers.
(Check the Windows Device Manager first -- you may already have COM numbers assigned to physical RS-232 ports, virtual com ports created by USB<-->serial "dongles", USB-connected GPS devices, Bluetooth links, radio CAT controls, etc. You don't want to assign port numbers already in use by existing devices.)
| Useful Hint: Anyone repeatedly
fiddling with COM port settings will find having one-click direct
access to the Windows Device Manager useful. Right-click an empty area on the Windows desktop, and choose "New", and then "Shortcut". In the resulting dialog, enter devmgmt.msc into the "Enter location of the item" box. On the next window, name the shortcut "Device Manager". OK and close. You will now have a direct one-double-click shortcut to the Windows Device Manager on your desktop. |
Checking the "use Ports class" boxes causes the newly added ports to show up in the usual "Serial and Parallel Ports" branch of the Device Manager tree. if you don't check these, the new ports will continue to appear in the "Other Devices" branch instead. Some applications that offer port selection dialogs will then fail to offer them as choices. In either case, click the "Apply" button, exit the program and reboot the computer. Then check the Device Manager to verify that the COM ports are configured as desired.
The wiring showing cross-connections between the two ends of the port pair are more than just pretty graphics. You can actually drag and drop the hand-shake lines to "rewire" the connections for DSR, DTR, RTS, CTS and RI -- just as you would soldering jumpers across the pins of a physical DB9 or DB-25 connector. This might be useful if you have a program that is fussy about serial-port hand-shaking configuration; i.e. requires hardware flow control.
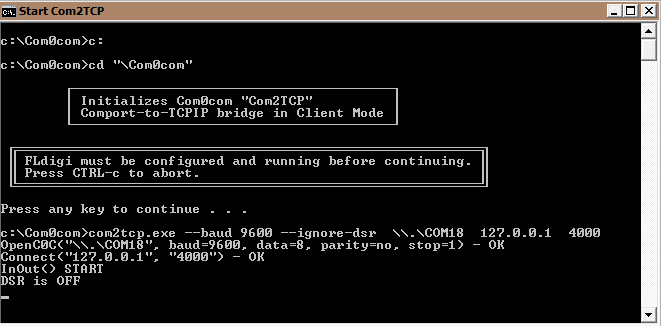
Com2TCP is an normal transient program that loads on demand, launched from a batch file. It disappears each time you reboot, or shutdown the application using the IP end of the bridge. (In this case, FLdigi.) Note that FLdigi must be started first, before the serial-to-IP bridge will load and start. Com2TCP opens a black "command window" a.k.a. "DOS box" when started. Do not close it while Com2TCP is running. You can minimize it to the Task Bar, but don't close it. When you exit FLdigi, the bridge will terminate, and the black command window will close, automatically.
The command window looks like this.

You will need to edit the batch file that launches Com2TCP to reflect the COM port and IP port # you are using. The command line takes the form of:
com2tcp.exe --baud 9600 --ignore-dsr \\.\COM18 127.0.0.1 4000
Note that the structure of the command line is somewhat quirky, with the option switches before the three arguments instead of after. The three arguments are the COM number to use, the TCP address to use, and the TCP port number to use.
Open Notepad or a similar ASCII editor, copy/paste the command line above into it, edit it as needed, and save it as something like "StartCOM2TCP.bat. Or you can download a copy of the batch file HERE .
If you open a command window (a.k.a. "DOS Box") and run Com2TCP with no options or arguments, you will get an extensive (and confusing) summary of all the options available to modify the operation of this program. Normally, these won't be needed for this application of COM2TCP.
Download Com0com and Com2TCP here:
https://sourceforge.net/projects/com0com/
Download Microsoft DOTnet here:
https://www.microsoft.com/en-us/download/details.aspx?id=17718
For convenience, I have bundled all the required components, including the Com0com tools, the batch file and the Microsoft DOTnet installer into a Windows "wizard-type" installer that makes a folder, creates Start Menu entries and desktop shortcuts. Download it here:
Note that some anti-virus programs go nuts over batch files in installer bundles. (Batch files are often used to automate the installation of malware.) You may need to temporarily disable your antivirus app during the install of this bundle.
UIview supports KISS interfaces over TNCs connected by classic RS-232 serial com ports.
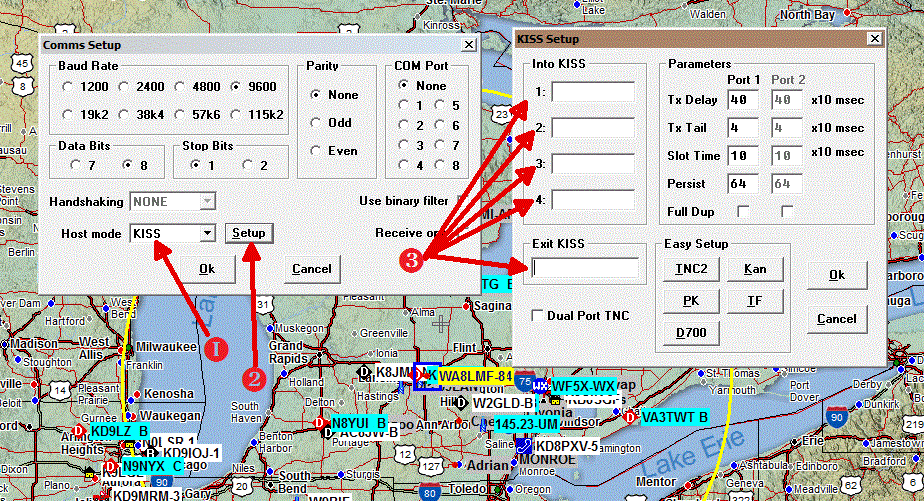
Start UIview and select "Setup", "Comms Setup". It is suggested to make the settings below with "COM Port" set to "None". Uiview has rather poor recovery from com port errors. It can get locked up for minutes at a time if erroneous settings are sent to com ports, or non-existent com ports are accidentally selected.
Exit the settings dialogs. Exit UIview. Restart UIview. Then reopen "Comms Setup" and select the desired com port. If the COM number matches the serial end of the bridge, UIview will immediately start up and communicate with FLdigi. Pressing "F9" (Send Beacon) should cause FLdigi to key up and send an APRS position report over whatever mode is selected in FLdigi.

