| WA8LMF Home Page | Updated 23 May 2006 - Changes are in red type. |

[ File download links are at the bottom of this page ]
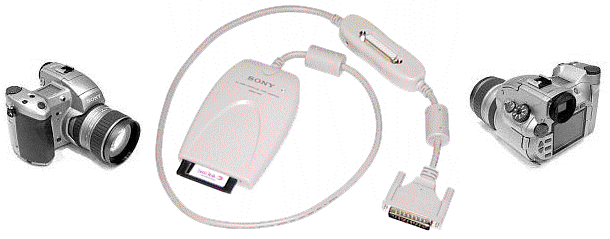
The Sony D700 and D770 digital cameras store images on standard PCMCIA cards (or compact flash cards with an adapter). Sony provides a PC-Card reader device, model MSAC-PR1, that plugs into a parallel printer port to transfer image files from the cards to your computer. Many D7xx owners have had considerable difficulty installing and activating the software driver for this device. This page is intended to provide useful hints and information on making the driver work. It also includes a downloadable file containing a newer version of the driver along with an easier-to-use installer/control panel.
D700/770 image transfer utility now on my download page (jump to paragraph at bottom of page)
Over a year has passed since
I first created this page. The "Centronics-type"
parallel port (classic printer port) is at the end of it's life after an over 30-year run (It
first appeared on pre-PC 8-bit CP/M machines and the Apple ][ in the late 1970s). At the
time I created the page, the majority of PCs in use either didn't have USB (Universal
Serial Bus) ports, or were running pre-98 versions of Windows which lacked support for
USB. Under these conditions, the only practical relatively fast connection one could
make to a PC (at least without opening the box and adding expansion cards) was the
parallel (printer) port.
Windows versions supporting USB have been out for over
8 years now, and is on the majority of PCs currently in use. Parallel and serial
ports are disappearing from new machines in favor of
USB ports exclusively. Several Compaq "Internet Appliance" models are this way
already; they have 6 (!) USB ports, [two on the front panel and 4 in the rear] and NO
serial, parallel, keyboard or PS/2 mouse ports.
In view of all this , I now strongly recommend that you look to
the future and buy a USB-connected card reader device (they are
available for about $20-$30). Adding USB devices is infinitely less hassle than
fighting all the problems involved in getting the parallel-connected reader device to
work. This is especially true if any other devices are also trying to use
the parallel port. (USB was designed from the ground up to accommodate multiple devices;
the parallel port was NEVER intended for anything but printers.)
The Sony parallel port adapter is based on parallel-port interface chips and drivers developed by Shuttle Technology. Shuttle Technology has been acquired by Standard Microsystems at http://www.scmmicrosystems.com . The old www.shuttletech.com page now redirects your to SCM's page. See more info below ] Shuttle does nothing but develop chip sets and device drivers to connect practically anything to a parallel port. All these drivers are implemented as "virtual SCSI" devices (that is, they show up in the Windows 95/98/NT Control Panel Device Manager as SCSI interfaces). Their chips and device drivers are used by, among others,
Sony MSAC-PR1 External PC-Card Reader
HP 7200e external CD-ROM recorder,
Sparq 1GB removable drive (External Version)
Some Versions of External LS-120 Superdisk Drives
H45 Parallel-to-SCSI Adapter Cable
H45 "Quickdrive" External Hard-Disk-In-A-Box
Several Parallel-port External CD-ROM Drives
[ Click Here for JPEG image of a stack of Shuttle-enabled devices]
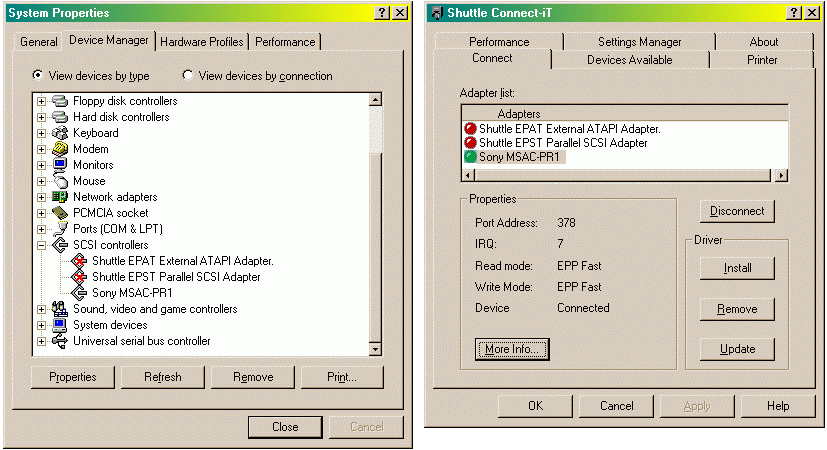
Shuttle provides a Win95 application called Connect-iT that allows you to install/activate/de-activate any of these drivers on-the-fly without shutting down or rebooting Windows. Connect-iT allows you to either permanently install a driver (returns on the next boot) or temporarily install a driver so that it disappears on the next boot. I am successfully connecting and disconnecting the Sony PC-Card reader, H45 SCSI cable driver (used with the HP Photosmart film scanner), the HP 7200e CD-recorder, and two different hard-disk-in-a-box devices ("H45 Quickdrives") with the Shuttle Connect-It application. The latest versions of both the Connect-It application and Shuttle drivers are freely downloadable from the Shuttle website. Shuttle also provides Win NT and OS/2 versions of these drivers although I can not report how well they work.

Screen Shots Showing Relationship Between Entries in Device Manager and
Connect-iT
A variety of Shuttle-developed drivers exist to support various Shuttle interface chip sets for different applications. Varying revision levels of these drivers are being bundled by different vendors. Each driver actually consists of two files with the same base name but different extensions: The actual driver file ending in .MPD (Mini Port Driver) and the installer information/configuration file ending in .INF . It is possible for more than one .INF file to call out and install the same .MPD file but with different option switchs, device names, etc. Connect-iT reads the .INF files and uses the information to copy the .MPD file into the \WINDOWS\SYSTEM directory and then activate it.
EPAT (Enhanced Parallel AT Interface) for various non-hard disk IDE devices like CD-ROMs
EPATHD (Enhanced
Parallel AT Hard Disk)
for actual IDE hard disks attached to the parallel port. [Also used by Sony for their PC-CARD reader. Fully-compliant PCMCIA memory
cards are supposed to present an interface like a hard disk to the
system]
EPATRM (Enhanced Parallel AT Removable Media) for Qyquest drives, etc.
EPST (Enhanced Parallel -to- SCSI Cable)
EPLS120 (Enhanced Parallel LS120 Superdisk Drive)
Recently, Shuttle released a newer series of drivers. (I am guessing that the W9X in the names reflects updates to ensure compatibility with Win98 as well as Win95.)
EPATAW9X (For non-hard disk ATAPI devices like CD-ROM drives)
EPHDW9X (A unified driver for hard disks and removable media devices)
EPSTW9X (For Parallel-to SCSI Cable)
EPLSW9X (LS120 Superdisk Drive)
The Shuttle Tech EPATHD.MPD driver ver 1.31 was the core of the driver provided on Sony's CD-ROM. It was installed by a massive InstallShield setup program instead of Shuttle's compact and flexible Connect-iT. The current (and final, I think) version of the EPATHD driver, on Shuttle's web site, is Ver 1.36.
Toward the end of 1998, a new unified driver EPHDW9X (currently at Ver 1.41) that combines the functions of the previous hard disk and removable media drivers was released by Shuttle. I have created an version of EPHDW9X specifically for the Sony reader by copying EPHDW9X.INF to EPHDW9XS.INF and then adding Sony-specific configuration info to it. Either .INF file installs the same .MPD driver file but with different option switchs.
The SHUTTLE.EXE file downloadable below is a bundle of the Connect-iT utility, all the current "W9X" series drivers, their respective .INF files, and the added .INF specifically to configure/activate the Sony card reader. I have packaged all this stuff into a single self-installing file using the INF-Tool install-file-builder utility.
Sony Card Reader: Have a memory card in the card reader's socket before attempting to install the driver. Part of the ROM firmware that makes the card "look like" a hard disk to the driver is inside the card. I leave the uselessly-small Sony memory stick in it's PCMCIA-card adapter parked in the reader whenever I don't have any other card inserted, to give the driver something to detect. ANOTHER USEFUL TRICK for PC-Cards: Stick a 1 to 1 1/2 -inch-long piece of clear package-sealing tape (folded back on itself sticky-side-to-sticky-side) about an inch wide to PCMCIA cards. It gives you a tail to grab, to easily pull them out of the camera or laptop PCMCIA slots without interfering with the camera's door.
Sony Card Reader: Choose the manual install option in Connect-It and choose the EPHDW9XS.INF entry specically.
Use the Windows Control Panel as an alternative means of installing the driver if Connect-iT locks up or crashes. Insure that the card reader is connected and that a card is inserted. Start the Windows Control Panel and click on the "Add New Hardware" applet. Start the detection process. When it detects the reader and asks for an install disk, hit browse and navigate to \Program Files\SHUTTLE and select the EPHDW9XS.INF file. This will make a permanent (at least until you delete the driver in the Windows Device Manager) installation that will try to reappear on every boot.
Your parallel port must be configured to a standard address; either 378 or 278. Many ports, epecially on IBM machines and some others, come configured to 3BC. The Shuttle drivers (and most other parallel port drivers) can't function on 3BC. If the parallel port is part of the machines motherboard (as it is on nearly all Pentium class and later machines), enter the motherboard BIOS setup utility (usually by hitting DEL or F1 during the early boot process), select "Integrated Peripherals" or something similar and ensure that the built-it LPT port is LPT1 set to an address of 378 with IRQ7.
Insure that sound cards or other peripherals are not "hijacking" the interrupt line IRQ7. (Standard Windows printing does not use the interrupt provided on the parallel interface; other devices often steal it in chronically IRQ-short fully-loaded PCs. ) Although your printer may not need the interrrupt, most other gadgets connected to the parallel port do either require it or run a lot faster with it.
Don't even attempt to get the drivers to work if you have one of those horrible all-in-one multifunction printer-scanner-fax devices such as an HP OfficeJet or Canon Multipass installed if the all-in-one uses a parallel port. These highly invasive devices completely monopolize the parallel port with intensive and continuous two way communications. They totally deny access to the port from any other application. (This is by contrast with standard drivers that "borrow" the port from Windows for each print job, and release it for re-assignment when they are done.)
Many of the current drivers for low-cost inkjet printers have a similar problem. Many of these printers have been cost-reduced by unloading onto the host system functions that should be handled by a more powerful processor in the printer. Beware of any printer driver that loads a resident "status monitor" or similar application that resides in the system tray (lower-right corner of Win9X screen). These applications typically warn you of low ink levels, paper jams, etc. They work by monopolizing the port in order to continuously poll the printer's condition and will deny access to the port to other applications.
Install another parallel port if your present parallel port is being monopolized by conflicting
devices. Classic AT-ISA bus cards are available for as little as $15 while
high-performance PCI cards can be had for $25 to $30. The ISA cards are actually
preferrable since they can be hardwired to an address with jumpers; the PCI cards normally
are soft-configured by Plug-N-Play. If you use an ISA card, set it's jumpers to select
address 278 and IRQ5. If you install a PCI card, move all your present printer drivers to
it and use the newly freed-up original LPT1/378/IRQ7 port for the Shuttle devices. On recent USB (universal serial bus)-equipped
laptops, consider moving your printer(s) to a USB port. USB-to-Centronics adapter cables
(that allow a standard parallel-interfaced printer to plug into the USB port) are available
for under $35.00. You have USB on your machine if you have one or two connectors that look
like flattened telephone jacks with the logo
![]() nearby. (You must have Windows 98SE or
later to fully use USB. Win95B/C
provides a rudimentary incomplete implementation of USB). IMPORTANT!: The
original version of Win98 incorporated USB support that worked with nearly all USB devices
on the market at the time. Win98 SE (Second Edition) released a year later included
supposedly new and improved USB support that caused about half of all USB devices
(including my USB HP PhotoSmart scanner) to quit working(!). If you are using Win98SE, go to the Microsoft website and and
search for the patch utility 240075up.exe . Download and install this
patch that fixes most of the USB problems with Win98 SE.
nearby. (You must have Windows 98SE or
later to fully use USB. Win95B/C
provides a rudimentary incomplete implementation of USB). IMPORTANT!: The
original version of Win98 incorporated USB support that worked with nearly all USB devices
on the market at the time. Win98 SE (Second Edition) released a year later included
supposedly new and improved USB support that caused about half of all USB devices
(including my USB HP PhotoSmart scanner) to quit working(!). If you are using Win98SE, go to the Microsoft website and and
search for the patch utility 240075up.exe . Download and install this
patch that fixes most of the USB problems with Win98 SE.
Install-over upgrades of Windows can cause/hide numerous problems with drivers. If your system has been repeatedly upgraded from one version of Windows to another, you probably have a mish-mash of unknown versions of numerous system files or inappropriate drivers. [ Click here for a longer sidebar on the Windows version management nightmare ] The only real fix is to complely wipe out the current Windows installation and do a from-scratch cold install.
Clean up any current Shuttle-based drivers before installing this bundle. If you have previously installed the Sony-provided version of the driver and/or any other Shuttle-enabled devices on your system, you probably have several versions of drivers and/or the Connect-iT utility scattered across your system in different directories. Before installing:
Run any current version of Connect-iT and remove any drivers listed. Note the option switch settings since you will want to apply them to the newer drivers.
Start the Windows Control Panel, click on the "System" applet and then on the tab "Device Manager". Scroll down to "SCSI Adapters" and delete any Shuttle-related entries.
Locate the directory \WINDOWS\INF\OTHER. Delete any Shuttle-related .INF files found there after saving copies on a floppy or other location (you may need to refer to option switchs or settings found in these text files later).
This should get Windows to forget about any current versions and allow the install of the newer versions without difficulty.
During the install of a driver, the installer may say it can't find a file and prompt you for the Windows CD-ROM. This is a maddening quirk of Windows .INF installers; they always seem to look to the directory Windows itself was installed from, instead of the directory where the install is being run. Just hit the 'Browse" button and navigate back to \Program Files\SHUTTLE to locate the requested file (normally the Shuttle .MPD file).
Some users are reporting two instances of the driver are showing up in the Windows Device Manger and Connect-iT. I have no explanation yet for this behavior but it doesn't seem to keep the driver from functioning.
Shuttle Technology has been acquired and merged into another company, SCM Microsystems. The former Shuttle Technology website, http://www.shuttletech.com , now redirects you to SCM's website homepage http://www.scmmicrosystems.com . Slightly updated versions of the former Shuttle drivers are now on the SCM site at: http://www.scmmicrosystems.com/corporate/support.html . The drivers have been repackaged into a much larger file (2.6 - 3.2 MB download each). A single setup program for Windows 3.x, Windows 9.x and Windows NT automatically selects the appropriate components for the operating system it is run under. Three separate files are provided (one for each interface):
SCM Parallel-to-ATA (Hard Disk) Ver 1.44 http://www.scmmicro.com/downloads.html?PID=36&s1=8&s2=61 (This is the one used for the Sony cardreader)
SCM Parallel-to-ATAPI (CDROM) Ver 1.41 http://www.scmmicro.com/downloads.html?PID=35&s1=8&s2=62
SCM Parallel-to-SCSI Ver 2.21 http://www.scmmicro.com/downloads.html?PID=16&s1=8&s2=63
Each download also includes
a slightly newer version (2.12) of the Connect-iT control panel utility. A separate set of
downloadable files is provided for Windows 2000.
I extracted the relevent components for Win95/98 from the three files
above, and combined them, along with the Sony card reader add-ons, into an updated
version of my previous SHUTTLE.EXE bundle. This is now on my DOWNLOADS page. Note
that the "official" SCM distribution for ATA Hard Disk does not include several
files required to support flash memory devices so that they will "look like"
hard disks. These files (which were part of the original Sony driver package) are
in my distribution.
Note that Windows 2000 is not explicitly supported by my
distribution. It may or may not work; I have not had a chance to try any of these drivers
under Win 2K.
This freeware utility written by Peter Chow, a regular member of the D700 mailing list on Yahoo Groups, will automatically seek out the directory on a PC card containing D700/D770 JPG images and transfer them to the directory of your choice on a hard disk. In addition, it extracts the exposure data stored in the header of each picture, decodes it and writes it to a text file. (Some image-editing programs won't show this data, or strip it from the file the first time the file is opened and then saved). Use jump to download page below.

Main Home Page: http:/wa8lmf.com
Unofficial Sony DSC-D700 FAQ: http://www.charm.net/~mchaney/d700/index.html
Official Sony D700 Page: http://www.ita.sel.sony.com/products/imaging/dscd700.html